Friday, 15 December 2017
Animation scene
Sky dome - Space Dome

I have created space dome for the scene. This is very simple. The background could be improved with a better quality texture. In the future I could use Photoshop to make own space texture.

These two spheres have two planet texture on the them. These textures are of better quality than space texture. The planets added more to scene by adding to the background of the action.
Particles
This is the particle effect in Maya. This allows you to make various different particle affects which you can modify on how you want the particle to move,size,number,how long it will animate for and you can add various different forces.
This tool could be used to make engine thruster or explosions in the animation.
Test Camera render
This is my first attempt with doing the first scene using camera for this screen. This very poor quality,problems with lighting and he is not very smooth movements either.

Rigging - Used the skeleton to create joints tool to start to create skeleton for the hand 3d model. This tool allows you to rig a hand.
I have added all the joints to the 3D hand, Now this is ready to animate.
I used the interactive bind skin.This tool allows you to modify on how you want to move the rig. Allows yo to pick what areas you want to affect while moving it. This can be very useful for a hand since there multiple different movements which include wrist,fingers and thumb etc.
Extra tools animation
I created multiple 3d primitives and added newton physics on them. Down below you can see how the objects react to each other when newton psychics is applied.
You can see newton physics applied to the 3d objects. This tool would be great for using animation if I need 3d objects in my animation to collide togther.
I used tool vortex this allows a 3b object go around and around.
Down below you can see it turning around. This tool could be used for asteroids in the animation.
Monday, 4 December 2017
Week 10
I used the CV curve tool which allows you create a curve.
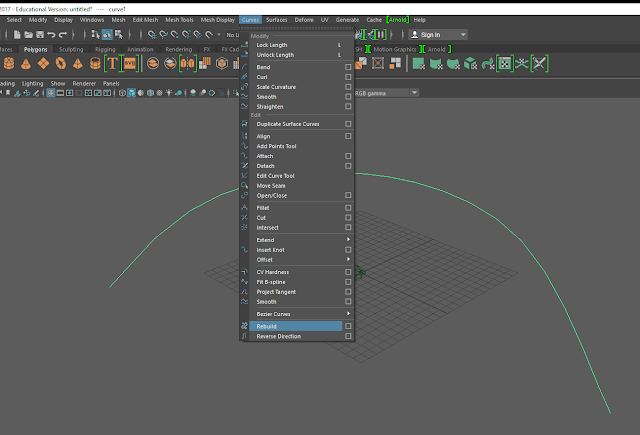
 I used rebuild tool which allows the curve to have more points and smoothed it out. This make the object that I will be animating more smoothly instead of jagged effect. This will help when I'm animating my star wars ships. Just like beizer curve you will be able to attach cameras too which can be seen below.
I used firework tool to create fireworks.
You can change various different settings to get various different effects. Down below I created sphere and selected fire tool.
The sphere is on fire. This tool can be used if I want to set my objects in animation on fire. You can experiment with settings to get the affect you want.
Animation Week 7 - 8 exercises
This is a handling exercise. This allows us to create an object that we can use to pivot the 3D object. This can be helpful when needing to animate an object but also need to pivot the object in various different positions or multiple movements. A great example of this is using to animate a door and door handle.
Down below is another exercise where I learnt how to use motion path.
This tool allows you to attach a 3D Object to a curve and it allows it follow the path that is created.
This image shows it in action. This tool is very useful since it allows you to animate 3d objects very fast. It can be good to animate the Star Wars ships since you will be able to create crazy loops and curves and the ship will follow. There is a problem with this in that object seems to accelerate during the animation. This can be fixed by smoothing out the graph line in the graph editor.
You can add cameras to the scene and animate them so you will be able to get the camera to follow the 3d objects. This allows you to create more dynamic animations.
Now this exercise is simple. I starting by creating a sphere. Then I had to reverse the faces of the sphere which means all the faces are no longer outside , they are are inside of the sphere. Down below all the faces are reversed inside the sphere.
This allows you to put a texture inside the sphere , which will can be used to create a sky dome. This method allows you create space environment inside the sphere. This is a very quick method too and straight forward to use.
Subscribe to:
Comments (Atom)


